Sewing

Ethical Clothing with The Guilty Feminist

Phew it’s been a while! Life has been very hectic with my new job and I’ve only made a few garments lately, which I haven’t had a chance to photograph.

Sewing is still on my mind, though, and none more so than this week when I listened to a podcast about ethical clothing.

I have become addicted to The Guilty Feminist over the past few months. It is a perfect balance of absolutely hilarious and hugely empowering. I would recommend it to anyone, you absolutely must give it a try. Great thing to listen to while sewing!

Their latest episode is all about the fashion industry and the little things you can do to make a difference. I was feeling really happy about the tiny number of garments I’ve bought lately because I’ve been sewing instead. Obviously, there’s always more I can do and I constantly try to improve, but it’s nice to know your impact is less than a lot of people.

Anyway, go and have a listen! It’s completely brilliant. Just a word of warning, I’ve been known to burst out laughing in the street while listening to it 😉

Guilty Feminist Logo

Sewing

Cora – The Fabric App For All Your Stash Busting Needs

So I’ve been pretty quiet on here lately. I’ve been spending most of my time job hunting and studying for interviews, but I’ve now been offered a job as a Junior Web Developer, which is so exciting! I’ve been wanting for quite a while to move from testing to coding so this is a fantastic opportunity. I’m looking forward to the new challenge and also to getting some time back for sewing and blogging. And what better way to get back into it than to take stock of my fabric stash?

Screen Shot 2016-07-13 at 22.27.35The lovely Hélène approached me last month on The Fold Line to test her new sewing app, Cora. Always keen to combine sewing and tech, I jumped at the chance. Sadly I didn’t get to give it as much of a spin as I wanted to during the main testing period due to the job hunting and a trip to Glastonbury Festival, but I’m now giving it my full attention!

cora fabric appMy first impression of the app was that the design was very clear, simple and intuitive. The homepage displays strips (or a grid) of photos you’ve taken of the fabric so you have an immediate visual on your fabrics. Yes, even on the bus you can scroll your way through every scrap of delicious fabric. This view also shows the length and type of the fabric. If you then click through to the detail view there are many options such as a nickname, whether it’s prewashed, weight etc. There’s also a notes section for you to add any miscellaneous information such as project ideas or scratchiness (just me?).

image

imagePart of my feedback was that the options for the main fabric colour are limited, which is something Hélène is looking to improve on. I may have made matters trickier by trying to add bronze floral brocade as my first fabric…

What makes this app super useful though, is the filtering. There are loads of ways to filter your stash, such as knit, woven, prewashed or minimum length. You can also sort the list by length, nickname, price etc. Finally, there is a search function, which will search on any field.

imageYou can download Cora from the app store and add five fabrics for free and then it’s a one off charge to upgrade to unlimited fabrics if you like what you see. It’s on 50% sale at £3.99 until 15th July, so get it while it’s hot! Sorry for posting this review so close to the deadline 😦 Better late than never? Android users, there is currently no app for you I’m afraid, but I believe Hélène is open to the idea of writing one if the iPhone one is a hit.

Worth noting that I received a free unlimited fabric upgrade for testing Cora, but opinions are my own and I wouldn’t have written this review if I didn’t genuinely think it was fab and recommend it wholeheartedly. Get your stash under control 🙂

Sewing

Me Made May 2016 – Two Weeks In!

Hi everyone, how has Me Made May been for you?

I’m very pleased to say I’ve kept up with my daily photos so far!  Follow me in Instagram if you want to be kept up to date. It has taken much of my blogging energy sadly, but I’m hoping to catch up with that soon enough. You might spot the odd spoiler here, but I’ve been keeping them to tantalising glimpses, haha! Without further ado, here’s my May in outfits so far:

As predicted, I found it a lot easier than last year with my much more handmade-heavy wardrobe. I’ve filled many wardrobe holes such as tops and jersey fabric. The photos have highlighted the lack of variety I have in my cardigans. I wear that blue one to death and I really need to make some in other colours. I have the Seamwork Wembley and Oslo cardigan patterns in the stash, so I just need to look out for the perfect fabric.

How excited are you for Sewing Bee on Monday?! Can’t wait 😀 Haven’t spotted any bloggers I recognise from the promotion photos, but I’ll be looking out for any new ones I need to follow. If anyone’s looking for a discussion forum then you should head over to The Fold Line, which is a great website if you haven’t heard of it. I’ve been looking there for all my Sewing Bee gossip 😉 They’ve also just released a GBSB guide for all the info you could possibly need.

For the rest of Me Made May I’ll be trying to dig out some items I haven’t worn in a while to make sure I get full mileage out of my me made wardrobe. I’m just too damn pleased with my Hawthorn Dress to take it off…

Me-Made-May

Me Made May 2016 – I’ve Signed Up, Have You?

image

It’s that time of year again! How did it come around so quickly?! Time for all the sewing bloggers (and non-bloggers!) to prep their wardrobes ready for the wonderful challenge that is Me Made May 2016. Last year I found this a bit of a struggle because I had to keep washing and wearing the same few items and I got pretty bored of them by the end of the month. This year I have made a lot more items and have several tops, which was my main wardrobe hole last time, so hopefully it will be fairly easy. I do tend to wear me made clothes several times a week anyway.

So, here’s my pledge:

I, Bonnie from Summer Sun Bear, sign up as a participant of Me-Made-May ’16. I endeavour to wear at least one item of me made clothing each day for the duration of May 2016, not including PJs or underwear.

I would love to get to the stage where I could wear entirely me mades, but I haven’t tackled trousers or cardigans yet – wardrobe hole identified and acknowledged.

Last year I entirely failed to document any of MMMay past the first week, so I’m not going to promise anything, but my plan is to instagram a photo every day and then possibly write a roll up post either weekly or at the end of the month. Will see how it goes! The main thing is that I wear the clothes and enjoy the experience. Come and join the instagram party – I’m @summersunbear 🙂

Have you signed up for Me Made May 2016? Are you looking forward to it? I know I am!

Dressmaking projects

Wifi Hawthorn Dress

“Look at the lovely Japanese fabric I bought!”

“Why is it covered in wifi symbols?”

“It’s not! This is a traditional Japanese pattern, it looks like waves.”

“Radio waves? From the wifi?”

“….”

Last year I made a muslin of the Colette Hawthorn dress from Swedish Tracing Paper and it was a complete disaster. It didn’t fit at all and I had no idea why, so my Hawthorn pattern was cast into the back of my pattern stash never to be seen again. However, a combination of finding the perfect fabric for it at the Knitting and Stitching Show, being more confident at pattern alteration and having a few days free over Easter to devote to it persuaded me to try again. Look how she turned out!

hawthorn dress

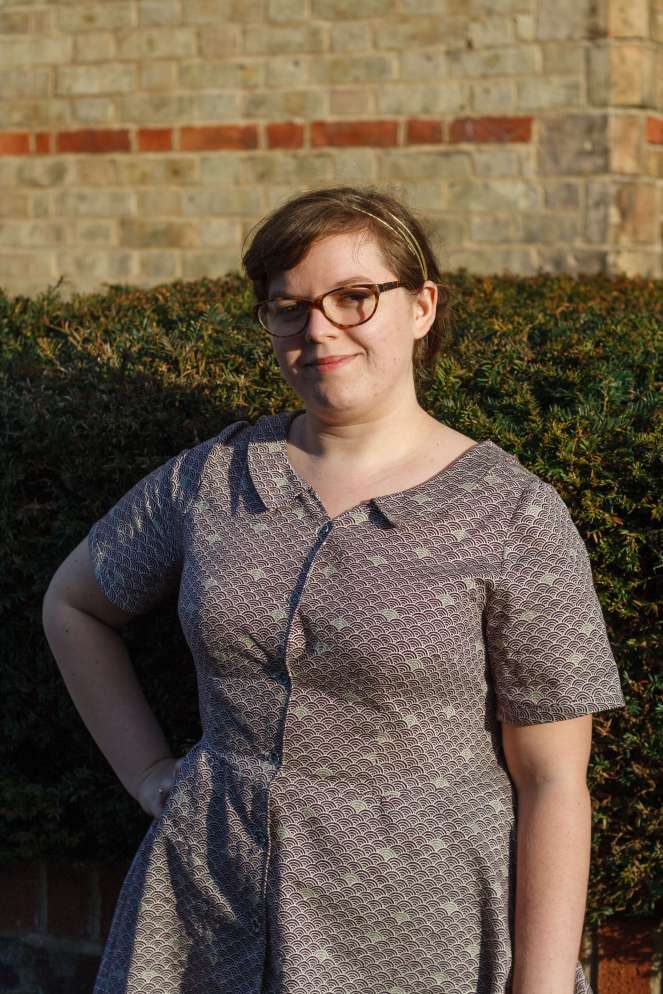
The Pattern: Colette Hawthorn Dress

Described by Colette as a ‘curve-hugging classic that combines gamine styling with a flattering and feminine fit’, the Hawthorn dress has been on my radar for quite a while. I’m a sucker for a shirt dress and the flat collar gives it a slight twist which I think elevates it above some of the other offerings. I have quite a few patterns with gathered skirts, so I thought a smooth quarter circle skirt would make a nice change.

hawthorn dress

Hawthorn dress

Pattern Alterations

Part of the reason my last muslin was so off last time is that I am wildly across sizes on the pattern. My overbust is size 8, but I’m size 14 at the waist and hips. So, I traced out a size 8 bodice front and back onto parcel paper. I then performed a 1 inch full bust adjustment (FBA), adding in a bust dart. I made the waist dart smaller than the FBA called for in order to increase the waist size, shortened both the front and the back bodice pieces and added in a little width to both bodice pieces at the side seam. I sewed this up into a swedish tracing paper muslin and was very pleased with the fit. The only issue I had was that the armholes were too high up under my arms, so I cut this about an inch lower on the muslin and transferred this change back to the pattern. I then measured around the new armhole with a measuring tape and compared this to the different sleeve sizes and decided size 12 fit it best. So I ended up with a heavily modified size 8 bodice, size 12 sleeves and size 14 skirt. If you’re wildly off the pattern sizes and you aren’t happy to do a lot of alterations I would approach the Hawthorn dress with caution! That said, the fit has come out beautifully, so it was definitely worth the extra effort and I’m very pleased.

Hawthorn dress

Hawthorn dress

Construction

I found the construction fairly simple, having done collars and sleeves before. I opted to take the short sleeve from the top version and add it to the version 2 dress so that it would be nice and cool in the summer. The muslin had tight sleeves, so I let out a bit of the seam allowance in the final sleeve, which probably wasn’t necessary and has left them a bit boxy but I think it looks fine. I also added in-seam pockets and chopped a few inches off the skirt before hemming. This isn’t a quick and dirty pattern by any means – including all the pattern alterations and cutting out the fabric this took me the best part of three days, but I really enjoyed every minute of it. The instructions were clear and helpful throughout.

hawthorn dress

hawthorn dress

The Fabric

The main fabric is a gorgeous Japanese ‘dobby weave’ cotton, which I bought at the Knitting and Stitching Show from the Japan Crafts stall, which was overflowing with tempting prints. The fabric somehow manages to be soft to the touch with a gentle drape, but also has an almost rough texture.

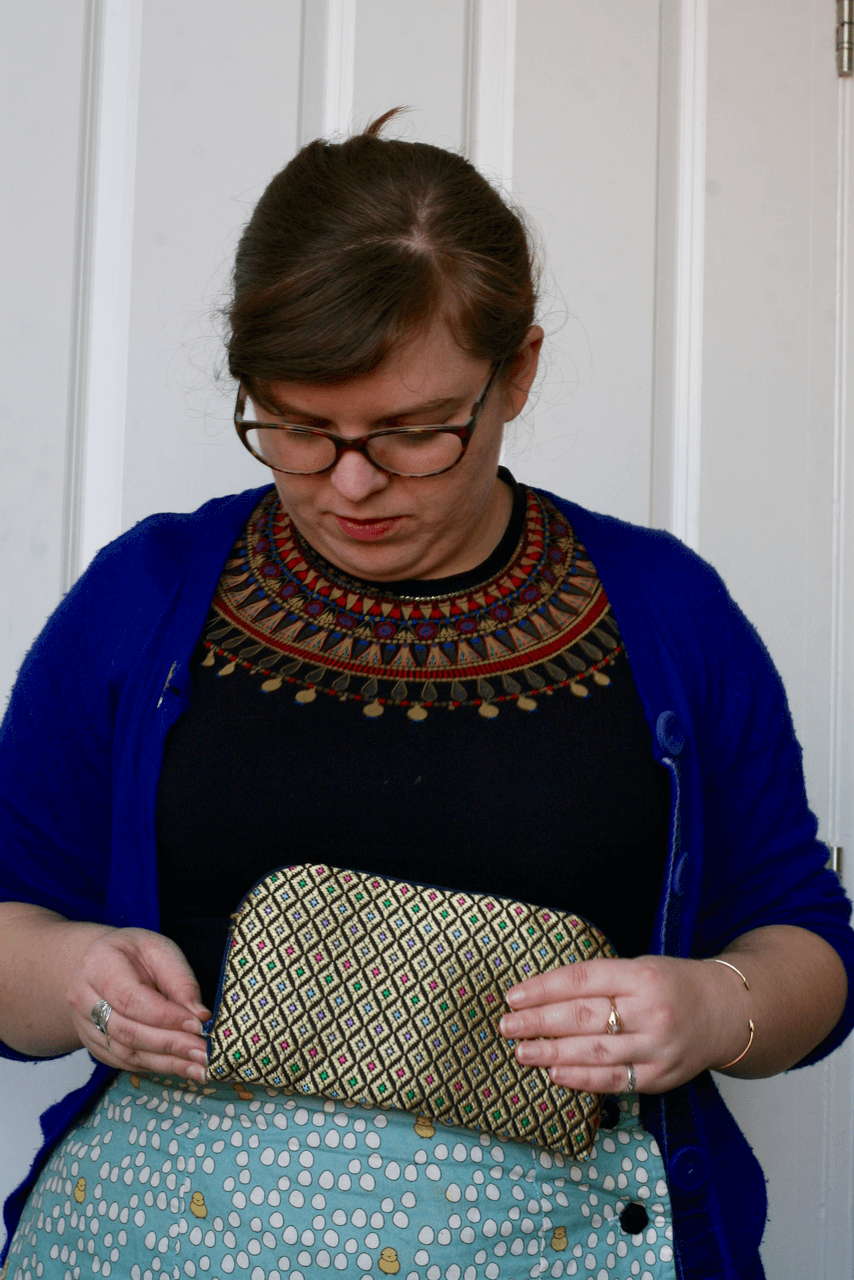
For the pockets I used a very cute Japanese cotton kindly gifted by my parents’ Japanese lodger (ありがとう ございます!). Look!! I have cats in my pocket 😀 The fabric actually came with a label on it that read ‘Kawaii!!!’. Anyway, I digress.

The final fabric is a koi carp print from my stash to make the inside look a bit more jazzy.

hawthorn dress

Hawthorn dress

hawthorn dress

The Buttons

These buttons were also from the Knitting and Stitching Show, though I can’t remember the stall unfortunately. I think they’re absolutely gorgeous! So unusual. I actually bought them before the fabric and didn’t realise until I got home how lovely they looked together. Unfortunately this also meant that I didn’t really buy enough because I had no project in mind, which resulted in the buttons being further apart than they should have been on the dress.

Hawthorn dress

What Needs Changing?

This button spacing has led to the main issue with this dress – there’s some gaping at the bust where there should be a button! This weekend I sewed on a hook and eye which is pretty much invisible and just keeps the fabric closed; it looks much better and makes me feel more secure. The only other issues were some spots where the fabric pleated a little on the skirt and armholes, but I think I’m the only person who will notice, so I’m not too worried. Perhaps the skirt should have been a size down to fit the waist better?

hawthorn dress

The Verdict (In Which I Gush Unreservedly)

I am in love with this dress!! I have never managed to achieve such a perfect fit on a bodice before, so I am very chuffed. I owe a lot of this to the Craftsy course I took last summer, Sew the Perfect Fit, which I would highly recommend (affiliate link, but I genuinely think it’s great) – you can see my blog post about it here. In short, I’ll be wearing my Hawthorn dress a lot and I’ll be making a lot more of them! I can’t wait to try the three quarter length sleeves with the cuffs.

Social sewing

Happy Birthday, Summer Sun Bear!

Wow, I made it! A whole year since I started this blogging malarkey!

summer sun bearI started Summer Sun Bear initially as a form of escapism – some personal issues last spring meant that I really needed an outlet and a distraction. Sewing is a lot cheaper than a therapist after all! I’ve loved completing projects and writing posts, but I’ve also discovered an amazing community of creatives online – always kind and encouraging with helpful advice. Being a part of such a lovely community helped me feel less isolated and alone, so thank you to you, dear reader!

I’ll let you in on a little secret. I’m really bad at finishing things. I have a tendency to get really excited about something and work on it obsessively for a little while and then get distracted by something newer and shinier and abandon it. I’m not proud of this – I try REALLY hard to finish stuff, but when I’ve lost the drive I just can’t keep it up. So I’m really proud that I’ve not only managed to finish so many sewing projects, but I’ve also managed to keep this blog going. I had a slump in the winter, which is my usual winter hibernation, but on the most part my posts have been getting better, my photos have been getting better and more of you have found my little sewing corner and come to say hello. If that’s not worth celebrating, I don’t know what is!

I’ve come a long way sewing-wise as well. I’ve tackled sleeves, collars, buttonholes, FBAs and many other pattern alterations. For most of my sewing career I had been sewing on a little Singer Featherweight, which I love, but it only does straight stitch and has a tendency to get birds nests, so the upgrade to my Pfaff last spring has opened many sewing doors.

To top the year off I thought I would pick five posts from the past year to share with you. I think they each represent an important step in my sewing journey and give you a taste of what I’m all about!

Spotty Mimi Blouse

mimi blouse

This blouse was a real achievement. I had never made a blouse or attached a collar, I don’t think I had even done any buttonholes with my buttonholer before (previous ones were shonkily hand stitched). I was also extremely lucky to have my mimi featured on Tilly’s blog, which was so flattering!

Circus Circle Skirt Pattern Tutorial

Circus Circle Skirt Pattern Tutorial

Glastonbury Circus Dress

This is the only pattern tutorial I’ve done so far (though I have others in mind for the future). This skirt is great for twirling in and I’d love to know if any of you have tried it out!

Red Roses Akita Blouse

akita blouse

This is the only Seamwork pattern I’ve made so far and it was super quick. I got a lot of amazing feedback on the photos for this blouse (thank you Ben!) – it was the first time I took any photos in public, which was totally cringe-worthy, but I’m getting better at controlling the embarrassment!

The Bodice Sloper Saga: Pattern Drafting

BodiceMuslin2.2

I drafted a bodice sloper! This was a massive step up in my sewing knowledge and the fitting knowledge I gained here has been shaping my sewing ever since (no pun intended, I wish I was that witty).

Coral Zig-Zag Moneta

moneta dress

This was a very early post and it shows – the photos are terrible! I may have tried to ‘warm’ the light by putting an orange Sainsbury’s bag over the flash… Errrr, yeah. Points for ingenuity maybe, but negative points for execution! However, this was the first time I had made anything from a knit fabric and I absolutely love it. I still wear this dress proudly. In fact, I really need to make another one of these. *hunts in stash hopefully for perfect fabric*.

So there we go, that’s been my year in sewing blog land. I’ve had a fantastic time doing it and I hope you’ve enjoyed hearing about it. I look forward to having you along for the next part of the ride 🙂

Dressmaking projects

Golden Greenbacks Wallet

I made a purse! I needed a purse, so I made a purse. Isn’t that an awesome thing to be able to say?

Golden Greenbacks Wallet - 3

The pattern:

The pattern I used is the Greenbacks Wallet by Sew Sweetness, which comes with pattern and instructions for three different wallets. I used version three for mine, which has card slots, a zipped coin purse and accordion sides to stop it flopping open. The instructions were pretty clear and contained photos for the trickier parts. It was definitely the nicest wallet I found when I was looking around, a lot of the patterns didn’t seem that practical, so I would recommend this one if you want a workhorse in your handbag.

Golden Greenbacks Wallet - 5

Construction:

It all went together pretty easily, though it gets tricker once the accordion has gone in because nothing will lie flat anymore, so the last few steps including the main zip are a little fiddly. The pattern calls for bias binding around the edge to finish the purse, but I thought this would detract from the vintage look I was going for, so I instead pressed the seam allowances of the gold fabric and pinned it in place before hand sewing it all the way around the edge. I think this was a good solution and looks pretty neat, though there are a couple of places where the frayed edges of the gold fabric have popped their little heads out. Nevermind, proves it’s homemade, right?

Golden Greenbacks Wallet - 1

The fabric:

The green spotty fabric is a quilting cotton from my stash. The purple is a japanese cotton, which I’ll tell you more about very soon. The gold fabric was kindly donated by Ben’s grandma when she was doing a clear out. I’m not sure what it is, something synthetic and it frays like nothing else, but it’s gold and shiny, so it’s worth the extra effort, right?!

Golden Greenbacks Wallet - 4

What needs changing?

This pattern is all about interfacing. I applied lightweight interfacing to all the inner pieces, heavy to the main lining piece and fleece to the outer shell. The pattern called for a foam rather than a fleece, but I couldn’t find any, so used the next best thing. I think it’s okay, but foam would probably have been a bit less flimsy. I might even try putting some card inside the outer shell as well. I would probably also go up to medium weight interfacing for the card slots next time – I’m not sure the lightweight is enough, especially on the side for notes where it had a tendency to gape a little. This gaping also means the interfacing is visible since the card slots are not lined with your patterned fabric. I think next time I will double over the card slot pieces to make the inside as pretty as the outside. Well, I wanted to learn about interfacing and I’ve tried a lot of different types now, so hopefully my next structured make will have a bit more, well, structure!

Lastly, I think I had my concealed zip hat on when I was sewing this, so I sewed very close to the zip teeth. This means the zips sometimes catch and need some encouragement to open (let’s call it a security feature). Pulling the zips open and closed a few times has loosened it up, but it’s something I’ll look out for in future.

Golden Greenbacks Wallet - 2

Verdict:

I’m really pleased with the overall look. The colours work well together and give the purse a nice vintage feel. The card slots are the right size for my cards and there’s plenty of them. I would definitely recommend the Greenbacks Wallet! It’s nice to try a project that has no fitting issues for once and it has pretty much all straight seams until you’ve inserted the accordion, so it sews up in no time.

Sewing tips

5 Sewing Shortcuts For The Lazy Sewist

I wrote a draft post last summer about some bad sewing habits I use as shortcuts. Looking back at it now, I’m horrified by most of them (not finishing my seams?! What was I thinking?), but I thought I’d write about some sewing shortcuts I still employ that I think will make your life easier. There are many ‘right’ and ‘wrong’ ways to sew and the hobby sewist can feel like they have to follow every rule in the book or the sewing gods will smite them down. Well, I want to give you an alternative. If sewing is your profession, or you enjoy doing everything perfectly then by all means follow the rules, but if you want to get the maximum fun out of your hobby without worrying about the rules then read on.

Hopefully I won’t be quite so horrified by them this time next year…

thread-colours

  1. Buy a select number of thread colours in bulk that will go with anything

There’s nothing worse than spending all night planning your next project and getting really excited about it, only to realise that you don’t have any matching thread. Honestly though, if your thread colour is a bit off, no-one is going to notice! My thread colours are navy, cream and red. I do basically all of my sewing in one of those colours. I don’t often sew with a pure black or white fabric and I find that black and white thread are too harsh against other colours. Navy and cream are a lot more mellow and look fine with most colours in my fabric stash except red. Take a look at your fabric stash and work out which colours will work for you to get maximum colour coverage.

  1. Save up your thread cutting and trimming

You have to be careful with this one, as the extra thread can get caught up and cause a nightmare of a bird’s nest, but if you carefully pull the excess thread to the back of the sewing machine and out of the way of the needle this can save a lot of time pulling the fabric out from under the foot and trimming individual threads. I especially employ this when I’m doing a series of buttonholes.

  1. Don’t make a muslin

Ok, hear me out with this one. I am totally on board with muslins, they help you understand your fitting needs and they mean you only ever make perfect stuff from your precious fabric stash. But you know what? I’m really impatient. Endless worries about it fitting absolutely perfectly only stop me from doing the bit I actually enjoy. Once I’ve made something I’ll analyse the fitting issues I’m having with it and refine in my next make, but I still get the fun of making/having a new garment to wear. That said, I do sometimes bother with a muslin, but I never want to feel like I HAVE to because that’s how it’s done. If you’re a sewist who likes to do everything by the book then by all means make a muslin every time, you’ll probably make a wonderfully tailored garment every time. But if you’re impatient and impulsive with your sewing like me, you might be better off without.

  1. Only change the bobbin thread when sewing basting/gathering stitches

Changing the bobbin is so much quicker than re-threading your whole machine. It means you can just cut the contrasting bobbin threads when removing the thread from your garment – it will be really obvious then which thread on the other side to pull. Be careful with this one, but I haven’t made a mistake with it yet (fingers crossed!).

  1. Don’t make a lining

You may have gathered by now that I’m quite lazy. I just want to wear that garment as soon as it comes out from under the machine foot, a cursory sweep of the iron and I’m good to go. However, sometimes you leave the lining out and then you put on your shiny new garment and it sticks to your tights like glue. We’ve all been through it. But there is a way to save these garments and it’s called an anti-static shift. Maybe I’m the last person in the world to have discovered this, but I thought slips were firmly for old ladies until Lisa at Sew Over It started going on about them on her vlog (which you should definitely binge-watch btw). So far I’ve only got a skirt slip (from Marks & Spencer), but I’m definitely in the market for a full length one because it will save me a lot of disappointing static issues in the future. And will stop me feeling guilty when I neglected to line something.

So there you go, those are mine, what are your sewing shortcuts? Do you think shortcuts are a bad habit, or a clever way to get the job done and keep yourself engaged?


Dressmaking projects

Easter Arielle Skirt

Hello everyone, how are you? I’ve got another project to show you already! I told you I got more done once the light came back 😉Easter ArielleThis, my friends, is my second Arielle skirt. I was besotted with this pattern when I made my Autumn Arielle – in wool it was perfect for the winter, but I needed one to take me through spring. And what better fabric than this squee-worthy chicks and eggs quilting cotton? I ordered it for Easter last year and it arrived a bit late, so I never got round to using it. I’m glad I’ve managed to make it into something this year!Easter ArielleHaving found the waist a bit too big on my last Arielle skirt, despite having graded in a size, I graded in another size at the waist for this one and I think it looks a lot better. I didn’t need to do any hacking with the button placement to get it to sit right. I would say that this is an oddity of my own body rather than a problem with the pattern.Easter ArielleThis time I didn’t line the skirt, which I probably should have done because it stuck to my tights quite a bit the first time I wore it. However, I’ve just been wearing a slip under it and it looks fine, so no harm done.Easter ArielleI hope you like the pictures. Our plan was to get some reflections in the edge of the water, but it turned into me wading out to get the right angle. The things I do for you! I think they turned out quite cool in the end though. Easter Arielle Easter ArielleEaster ArielleEaster Arielle Easter Arielle Easter ArielleOh, and here’s me saying Hi to the lovely Tilly at the Knitting and Stitching show this weekend! The eagle-eyed amongst you may have spotted that I wore this skirt to show her, I hope she liked it!TillyKnittingStitchingI had a great time at the show and I think I was very restrained, only coming away with one piece of fabric, some buttons and a pair of dressmaking shears. Also had great fun at the workshop for hand-sewn hexagonal patchwork. The teacher was fab (she said my stitching was ‘perfection’ 😀 ) and I came away with a great skill that will be really fun to do in front of the tv. I can imagine making it into some bags or cushion covers, or maybe I need to get fully stuck into the art of quilting? Hmm…

Dressmaking projects

Cosy Margot Pyjamas

Hello hello, how are you? I’ve been feeling very full of energy and enthusiasm lately, so I’ve been busily sewing away. The return of sunlight always sees me come out of my grumpy hibernation and return to a hive of activity 🙂

I had this plan in the pipeline for a while, but it wasn’t until the Winter set in here in the UK that I finally got around to it. I had just helped my friend Emma make her very first garment from my copy of Tilly’s Margot pyjamas and the weather suddenly turned really cold. Anyone who knows me will tell you how highly I prioritise cosiness, so I immediately whipped out this gorgeous sweatshirt material, which has a lovely fleecy finish on the inside and put my own pjs together in a couple of days. In fact, I had to get my mum off the phone so I could finish them in time for bed 😉

Cosy Margot

The sweatshirt fabric I used is a jersey fabric, but has only a little stretch to it. I bought it in a shop in Brighton, in the north laines, not sure what it was called, but they had a really nice selection of drool-worthy fabric and I’ll definitely be heading back. I found it listed on Guthrie&Ghani as well (sadly out of stock at the moment).

Margot pyjamas are designed for lightweight woven fabrics, so I used one size down to account for the negative ease in the fabric. This made it the perfect cosy size for cold nights (and evenings, mornings, any other time I’m not going to leave the house and can get away with wearing them).

The fabric is quite heavy, which means that the legs at the bottom are quite weighty. If I were to make it again I would probably taper them in a little to reduce bulk. In fact, that would be an easy alteration to make if I find that this is too irritating.

Cosy Margot

Cosy Margot

One last alteration I made to the pattern was to use elastic instead of a drawstring. I would always prefer to have a bit of give to my pyjama waistbands. This was no more complicated than feeding elastic through the waistband rather than a ribbon and sewing the two ends together before closing up the channel. I have included the buttonholes for a drawstring if I want to add one for decoration later, though. I could imagine a woven cream ribbon looking quite nice.

Cosy Margot

Cosy Margot

All in all, margot pyjamas are a perfect pattern for beginners or for when you want a quick project that will have few fitting issues. I think it works really well with a jersey fabric as long as you go down a size, so this could certainly be an intro to sewing with knits if you’re feeling daunted by them.

This weekend is the Knitting and Stitching show in London, which I have tickets for! Hooray! is anyone else going? I am quite worried about the state my bank balance will be in by the time I go home, but I’m looking forward to being in a wonderland of crafts and crafters.